您现在的位置是:网站首页> 硬件
树莓派技术收集
- 硬件
- 2026-02-22
- 2687人已阅读
树莓派技术收集

树莓派开发板
树莓派 Raspberry Pi 安装 Android TV 与遥控器键位修改
树莓派安装KODI,手机安装kodi remote 当遥控器
在树莓派上安装和使用Docker及Docker-compose的详细指南
树莓派来做电视盒子
KODI安装
树莓派中我们通过apt安装方式,安装如下:
sudo apt update
sudo apt install kodi
使用fswebcam
在实践过程中,树莓派对 USB 摄像头的支持不如 CSI 摄像头完美。偶尔会出现无法使用 USB 摄像头的情况,自带的摄像头操作命令 raspistill、raspivid 也无法使用。
而 fswebcam 这是一款小型摄像头程序(官网),则可以很好地支持 USB 摄像头。使用方法也很简便。
安装 fswebcam
安装 fswebcam,用于访问摄像头、进行拍照。
sudo apt-get install fswebcam
fswebcam 的用法
fswebcam --help
Usage: fswebcam [<options>] <filename> [[<options>] <filename> ... ]
 Options:
 -?, --help                   Display this help page and exit.
 -c, --config <filename>      Load configuration from file.
 -q, --quiet                  Hides all messages except for errors.
 -v, --verbose                Displays extra messages while capturing
     --version                Displays the version and exits.
 -l, --loop <seconds>         Run in loop mode.
 -b, --background             Run in the background.
 -o, --output <filename>      Output the log to a file.
 -d, --device <name>          Sets the source to use.
 -i, --input <number/name>    Selects the input to use.
 -t, --tuner <number>         Selects the tuner to use.
 -f, --frequency <number>     Selects the frequency use.
 -p, --palette <name>         Selects the palette format to use.
 -D, --delay <number>         Sets the pre-capture delay time. (seconds)
 -r, --resolution <size>      Sets the capture resolution.
     --fps <framerate>        Sets the capture frame rate.
 -F, --frames <number>        Sets the number of frames to capture.
 -S, --skip <number>          Sets the number of frames to skip.
     --dumpframe <filename>   Dump a raw frame to file.
 -s, --set <name>=<value>     Sets a control value.
     --revert                 Restores original captured image.
     --flip <direction>       Flips the image. (h, v)
     --crop <size>[,<offset>] Crop a part of the image.
     --scale <size>           Scales the image.
     --rotate <angle>         Rotates the image in right angles.
     --deinterlace            Reduces interlace artifacts.
     --invert                 Inverts the images colours.
     --greyscale              Removes colour from the image.
     --swapchannels <c1c2>    Swap channels c1 and c2.
     --no-banner              Hides the banner.
     --top-banner             Puts the banner at the top.
     --bottom-banner          Puts the banner at the bottom. (Default)
     --banner-colour <colour> Sets the banner colour. (#AARRGGBB)
     --line-colour <colour>   Sets the banner line colour.
     --text-colour <colour>   Sets the text colour.
     --font <[name][:size]>   Sets the font and/or size.
     --no-shadow              Disables the text shadow.
     --shadow                 Enables the text shadow.
     --title <text>           Sets the main title. (top left)
     --no-title               Clears the main title.
     --subtitle <text>        Sets the sub-title. (bottom left)
     --no-subtitle            Clears the sub-title.
     --timestamp <format>     Sets the timestamp format. (top right)
     --no-timestamp           Clears the timestamp.
     --gmt                    Use GMT instead of local timezone.
     --info <text>            Sets the info text. (bottom right)
     --no-info                Clears the info text.
     --underlay <PNG image>   Sets the underlay image.
     --no-underlay            Clears the underlay.
     --overlay <PNG image>    Sets the overlay image.
     --no-overlay             Clears the overlay.
     --jpeg <factor>          Outputs a JPEG image. (-1, 0 - 95)
     --png <factor>           Outputs a PNG image. (-1, 0 - 10)
     --save <filename>        Save image to file.
     --exec <command>         Execute a command and wait for it to complete.
使用 fswebcam
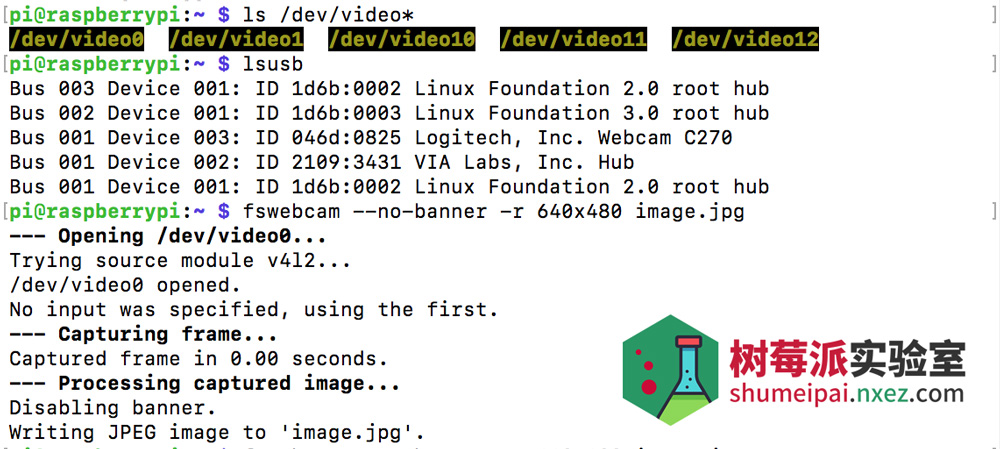
命令行下查看 /dev/下有video0 的设备。
运行 lsusb 命令,有相关摄像头的信息。
在终端中运行下面的命令来抓去一张来自摄像头的照片。
fswebcam --no-banner -r 640x480 image.jpg
或者你可以直接用:
fswebcam image.jpg
可以直接拍照,-d 用于指定使用哪个摄像头设备。-r 指定图片的分辨率,最后的是照片保存的路径。
如果拍摄出来的照片是一片漆黑,可能和摄像头启动延迟有关,可以通过加 -S 参数来跳过前面几帧解决。例如使用命令:
fswebcam -S 10 image.jpg
go编译树莓派上运行的程序
go编译树莓派上运行的程序
选编译为:cross-arm6

命令行arm
set GOOS=linux
set GOARCH=arm
set GOARM=6
命令行Windows
set GOOS=windows
set GOARCH=amd64
命令行Mac
set GOOS=darwin
set GOARCH=amd64
GOOS:目标平台的操作系统(darwin、freebsd、linux、windows)
GOARCH:目标平台的体系架构(386、amd64、arm)
交叉编译不支持 CGO 所以要禁用它
禁止用用:
SET CGO_ENABLED=0
树莓派上运行python
准备工作
首先,确保你的树莓派已经正确连接到电源并启动。你还需要连接一个显示器(如果需要),以便查看树莓派的输出。
安装Python
大多数树莓派操作系统都预装了Python解释器,但你可以通过以下命令来确保Python已经正确安装:
python3 --version
```
如果输出显示Python的版本信息,则说明Python已经安装。否则,你可以使用以下命令安装Python:
sudo apt-get update
sudo apt-get install python3
Python创建ftp
安装所需库
在开始编写代码之前,我们需要安装一些Python库来帮助我们实现FTP服务器的功能,打开终端,输入以下命令来安装这些库:
pip install pyftpdlib
编写代码
1、导入库
我们需要导入所需的库:
from pyftpdlib.authorizers import DummyAuthorizer
from pyftpdlib.handlers import FTPHandler
from pyftpdlib.servers import FTPServer
2、设置FTP服务器
接下来,我们需要设置FTP服务器的一些参数,例如端口、用户名和密码等:
设置FTP服务器的端口
port = 2121
设置FTP服务器的用户名和密码
username = "admin"
password = "admin"
创建一个虚拟用户授权器
authorizer = DummyAuthorizer()
添加一个匿名用户,并设置其主目录和权限
authorizer.add_anonymous(maindir="/home/pi", perm="elradfmw")
添加一个具有读写权限的用户
authorizer.add_user(username, password, "/home/pi", perm="elradfmw")
3、启动FTP服务器
我们需要启动FTP服务器:
创建一个FTP处理器
handler = FTPHandler
handler.authorizer = authorizer
创建一个FTP服务器实例,并绑定到指定的端口
server = FTPServer(("0.0.0.0", port), handler)
启动FTP服务器
server.serve_forever()
运行代码
将以上代码保存为一个名为ftp_server.py的文件,然后在终端中运行以下命令来启动FTP服务器:
python ftp_server.py
用树莓派做电视盒子,安装Android TV系统
一、硬件准备
树莓派(我用的是4b,其他版本也可以)、SD卡、读卡器。 当然还得有你的PC和电视机。
二、软件准备
我是直接用的OSMC,简单省事。有条件的老铁也可以直接在系统上装KODI就行。 你也可以直接搜OSMC的官网 https://osmc.tv/download/ 。
打开之后就是这个页面:
下载你的PC对应的安装工具,我用的是win的电脑。
三、OSMC安装流程
1.硬件选择
第一个选型 English。 第二个选型 选你使用的硬件。我选的pi4b
2.版本选择
直接最新版本
3.选择运行位置
我用的是SD卡,所以直接选”from an SD card“
4.网络设置
是配置OSMC的默认网络,其实这个不重要,安装好了都可以后面再设置。 我是直接选择了wired connection
5.选device
选你的SD卡。
6.agreement
直接同意
7.下载安装
这里点 yes,就开始下载镜像和安装了。
直接装可能会有点慢,如果你不会访问国外网站的话,可以去吃个小饭睡个小觉再来看看。
装好直接插树莓派里,记得插上视频线。
四、设置KODI
1.设置时区等乱七八糟的东西
这里没啥特殊的,步骤里有设置网络的,这里可以用有线或者无线,点进去可以直接设置。
BTW:这里可以用鼠标和键盘直接操作。
2.设置皮肤和中文
可以先设置皮肤,改中文前要务必要先修改字体。
3.添加IPTV插件
PVR插件里找 PVR IPTV Simple Client
4.添加 m3u
如果你只是想用airplay 可以不用这一步。添加m3u文件是用于看电视频道的。 想看什么频道的可以直接去 KODI中文网上去找。点这里官网 http://www.kodiplayer.cn/
进入设置
然后将位置改为本地,然后选择你的下好的m3u文件,再回主页的频道即可看电视了。
电视台一览
5. airplay投屏
KODI是不支持 屏幕镜像的。所以投屏需要点开视频app,打开你想看的视频,然后点右上角的小电视,选择OSMC(这个地方如果你前面改过硬件的名字,这里也会不一样)。
五、遥控器
AppStore里直接搜KODI Remote,安装好后与树莓派放同一局域网内。打开app就可自动连上。
加减音量、调频道可以直接操作。
树莓派刷Android系统
树莓派3 Android TV刷机包下载:http://www.mz6.net/soft/16814.html
树莓派3 Win32DiskImager刷机工具:http://www.mz6.net/soft/16815.html
1、首先解压Android TV刷机包,获得一个.IMG光盘映像文件(7G多);
2、准备1张16G TF卡,插入电脑,然后运行Win32DiskImager,注意右侧的盘符。
3、备份TF卡内的Raspberry系统,如果以后不打算再使用,此步可以跳过,还是建议大家备份一下~
备份方法:
任意盘内新建一个.img为后缀的文件,然后用Win32DiskImager打开这个.IMG结尾的文件。
点击Read,Yes,开始备份卡内数据,进度条走完,备份结束~~
树莓派 Raspberry Pi 安装 Android TV 与遥控器键位修改
用Rufus烧录到SD卡。
在树莓派上安装和使用Docker及Docker-compose的详细指南
系统更新及准备
在安装Docker之前,确保您的Raspberry Pi系统已经更新到最新版本。这至关重要,因为过时的系统可能无法兼容最新的Docker版本。在命令行中输入以下指令,以更新您的系统:
```
sudo apt-get update && sudo apt-get upgrade
```
执行完毕后,您的Raspberry Pi系统将保持最新,为Docker的安装奠定坚实基础。
获取并安装Docker
为了在Raspberry Pi环境中顺利安装Docker,您需要下载相应的安装脚本。在命令行中执行以下指令,以获取最新的Docker安装脚本:
```
curl -fsSL -o get-docker.sh
```
执行完毕后,您将拥有用于安装Docker的脚本文件。运行该脚本后,Docker将自动进行安装。请耐心等待,直至安装完成。
确认安装及运行测试
在命令行界面中,键入以下指令:
```
docker version
```
执行后,您将看到Docker的版本信息,从而确认安装是否成功。
安装完毕后,让我们通过运行Docker的hello-world镜像来体验一下Docker的魅力。若您的本地环境中尚未拥有此镜像,Docker将自动为您下载。
在命令行界面中,键入以下指令:
```
sudo docker run hello-world
```
执行完毕后,您将看到一条信息,确认您的Docker环境已准备就绪,您可以开始您的Docker之旅了。
上一篇:STM32开发相关信息收集
下一篇:硬件研发目录结构总结